
Customers
Overview
Customers are an integral part of all businesses. MX Merchant provides a detailed view of the recipients of your goods and services to keep you more aware of your customers' spending behavior.
Viewing Customers
To view a list of all active and non-active customers:
- Click the Customers tab in the left-hand menu.
- You will see a table listing all your customers. The following information will be displayed about each one:
- First Name - Customer's given name.
- Last Name - Customer's Last name.
- Profile - Spending profile assigned to the customer.
- City - City of residence of the customers.
- State - State of residence of the customers.
- Postal - Customer's ZIP code.
- Primary Contact - Primary means to contact the customer: Email, Mobile or Landline.
- Customer Number - Identifying number assigned to the customer.
- Last Activity - Date and time stamp of the last activity registered for the customer.
You can look up specific customers by using the Search and Filter options.
You can also generate as CSV file with customers throught the Export option and upload new ones through the Import option
Search
To search, simply type the customer name, city state or postal code you are looking for and press Enter ↩.

Filter
To access the filter:
- Click the down arrow ▾ to the right of the search box.
- Select the criteria you want to filter on,
- Apply.
- To reset your search criteria, click Default, and then Apply.
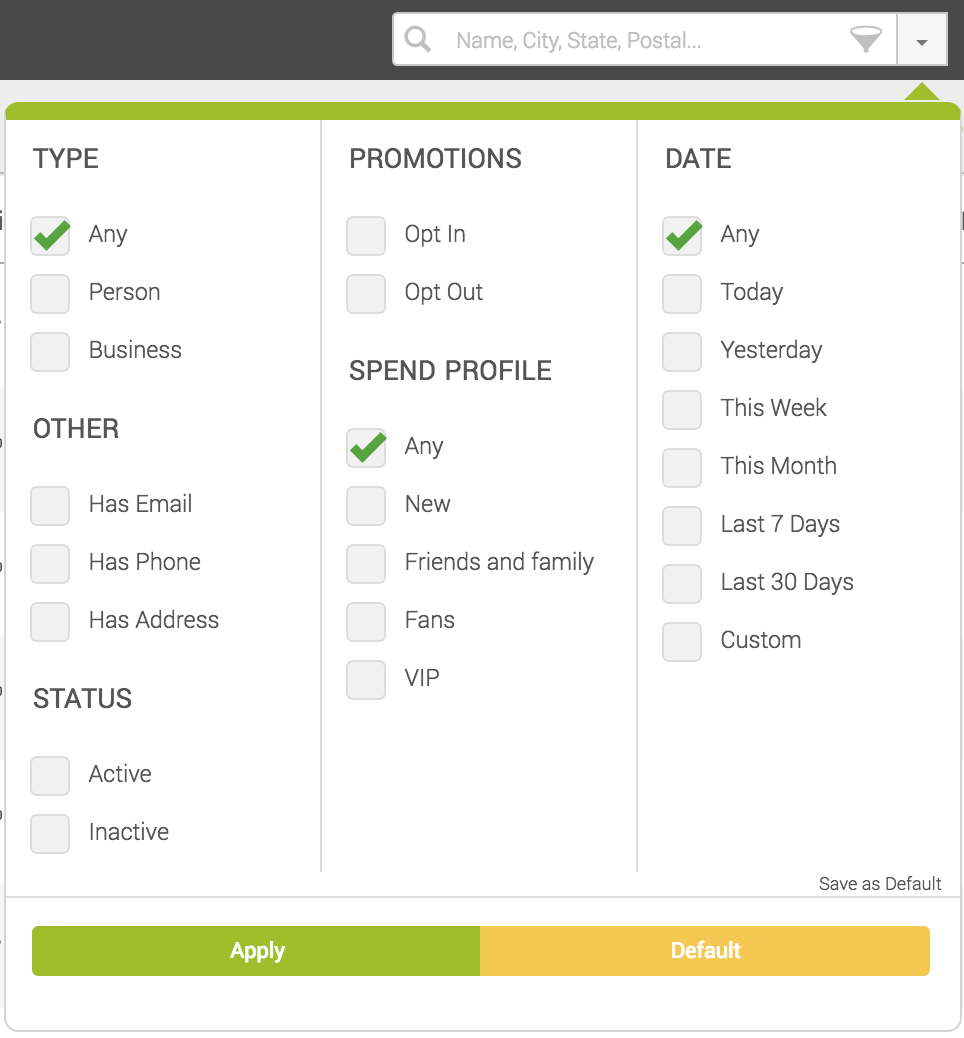
Notes:
- These filters will only be applied if you click the green Apply button at the bottom of the display, clicking outside the box will cancel your changes.
- You can set your own default by checking the desired boxes and clicking Save as Default
Importing and Exporting Customers
Businesses may need to import or export customer data in CSV format in several situations. Importing customers is useful when migrating data from another payment platform or CRM, adding a large number of customers at once, or synchronizing records with external systems such as accounting or marketing tools. Exporting customers can be helpful for creating backups, performing analysis in spreadsheet software, sharing customer lists with other teams, or transferring data to another platform. Using CSV files makes it easy to manage and move customer information efficiently between systems.
To import customers:
- Click the Import icon located in the top right corner.
- Click Select File on the left side.
- Choose the appropriate CSV file from your computer, then click Upload.
- Click Upload again in the bottom right corner to confirm the import.
Note:
The CSV file must follow a specific structure. If needed, you can download a template file to ensure the correct format.
To export customers:
- Click the Export icon located in the top right corner.
- The file will be downloaded automatically to your computer.
Creating New Customers
To create a new customer:
-
Click the Customers tab in the left-hand menu.
-
Click +Add Customer button in the upper right-hand corner.
-
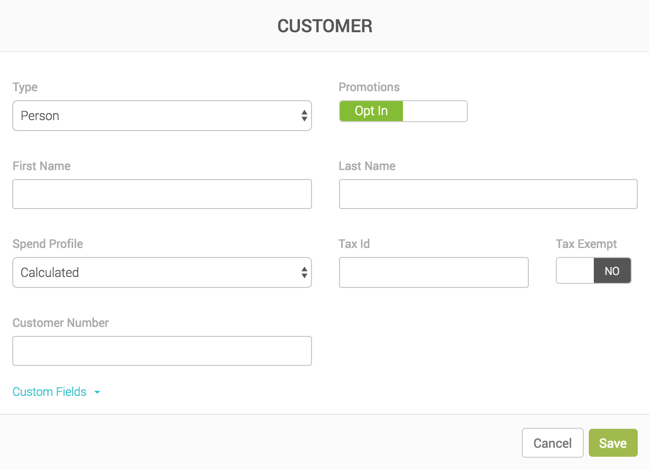
In the pop-up window, fill in the following information:
- Type - Type of customer: Person or Business.
- Promotions - Indicates whether or not the customer would like to get infomation about discounts or special offers: Opt-In or Opt-Out.
- First Name - Customer's given name.
- Last Name - Customer's surname.
- Business Name - Name of the business.
- Spend Profile - Customer category assessed based on your customers' spending habits.
- Tax Id - 9-digit tax identifier.
- Tax Exempt - Indicate whether the customer is exempt from paying taxes. Set to Yes by default.
- Customer Number - Custom number assigned for identifying the customer on MX Merchant.
- Custom fields - Custom fields specific to your business. You can configure these fields in the Customer settings.
Notes:
- First Name and Last Name will only show up and be mandatory if the Type is set to Person.
- Business Name will only show up and be mandatory if the Type is set to Business.
- Save.
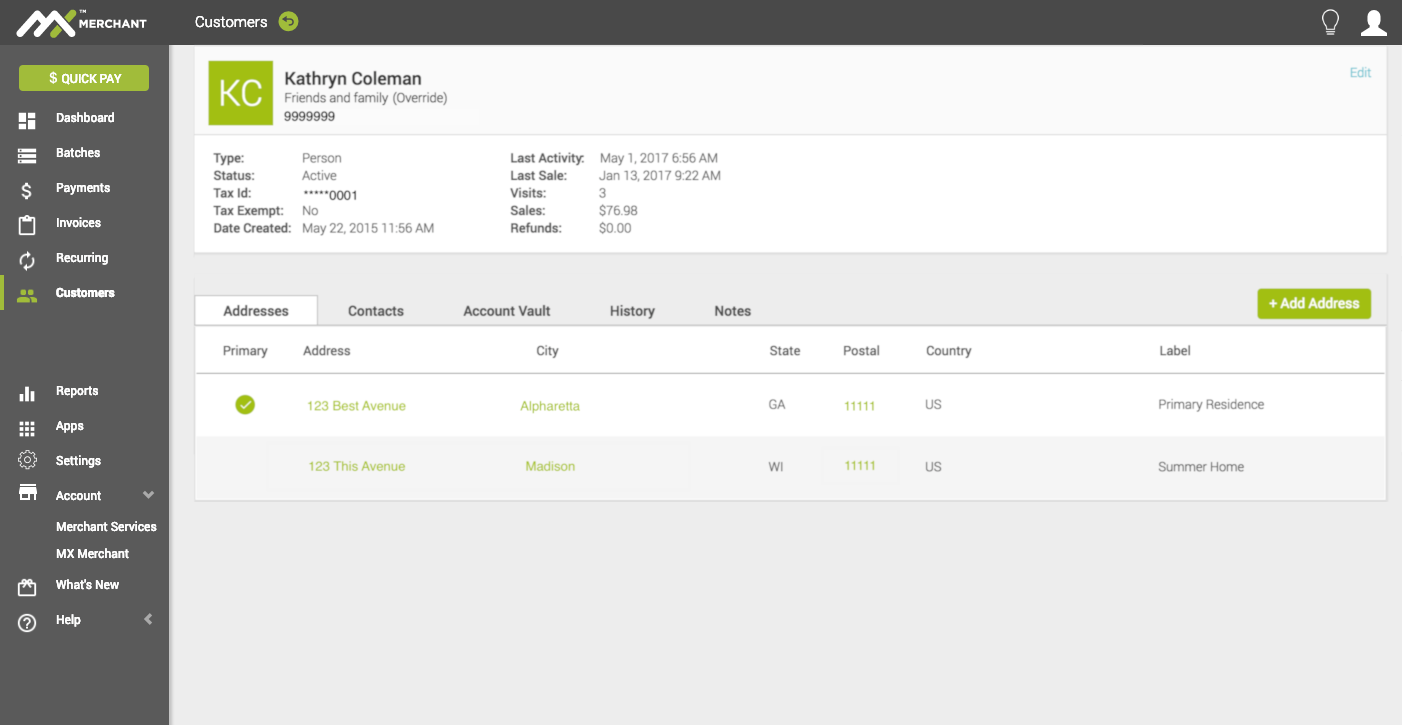
Viewing Customer Information
To see more information about a specific customer, click the customer name on the list in the customer tab (see Viewing Customers).
You will see several fields, many of which will be empty at first, but which you can edit and fill in as needed:
Upper Panel
- Photo – Profile image associated with the customer for quick visual identification.
- Full Name – The customer’s complete name as recorded in the system.
- Spend Profile – Customer category assessed based on your customers' spending habits.
- Customer Number – Unique system-generated identifier assigned to the customer for tracking and reference.
- Type – Classification of the customer, such as individual, business, or another configured category.
- Status – Indicates whether the customer account is currently active, inactive, or otherwise restricted.
- Tax ID – The customer’s registered tax identification number used for tax reporting purposes.
- Tax Exempt – Indicates whether the customer is exempt from applicable sales taxes.
- Date Created – The date when the customer record was first created in the system.
- Last Activity – The most recent recorded interaction or update associated with the customer account.
- Last Sale – The date of the most recent completed sale associated with this customer.
- Visits – The total number of recorded visits or interactions with the business.
- Sales – The total number or value of sales transactions associated with the customer.
- Refunds – The total number or value of refunded transactions associated with the customer.
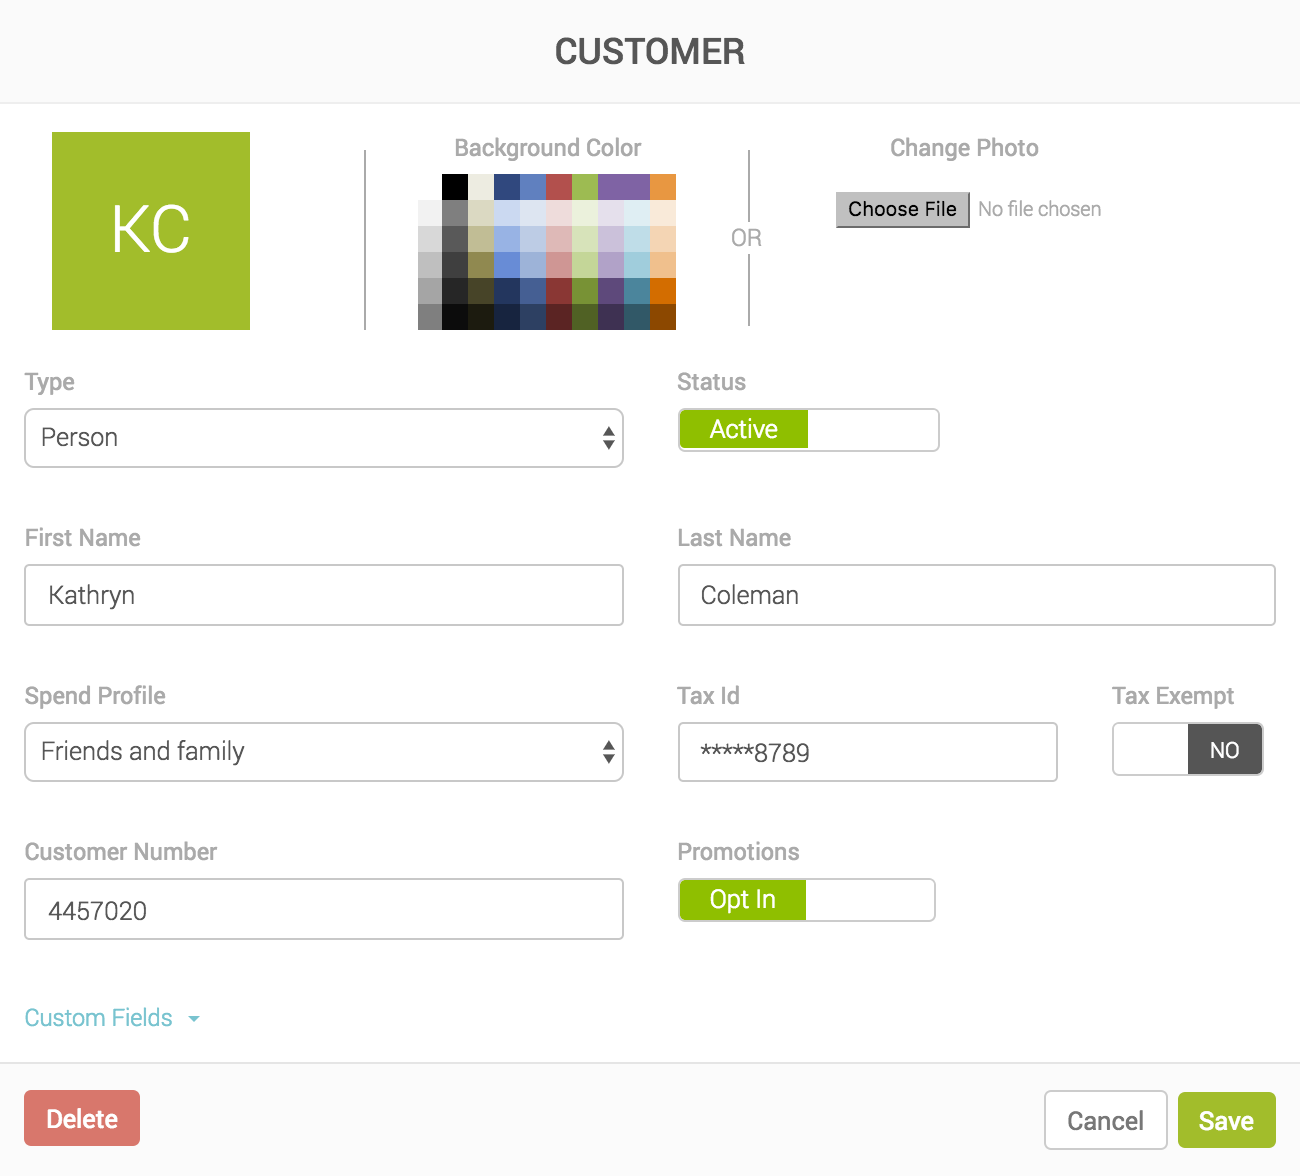
For editing the information in this panel, click Edit on the upper right-hand corner. You can edit most of the information above, as well as the background color.
Lower Panel (Editable)
- Addresses – Physical addresses associated with the customer.
- Contacts – Contact information related to the customer, including mobile numbers, email addresses, and landlines
- Account Vault – Payment methods associated with the customer for future transactions.
- History – Record of past activities, updates, or transactions related to the customer account.
- Note – Optional internal notes related to the customer for reference by staff.
- ePay - Registration information for MX ePay.
Learn more about each one below.
Addresses
The customer's addresses will be organized in a table showing the following information:
- Primary - Indicates whether this is the customer's primary address.
- Address - Customer's street address.
- City - City where the address is located.
- State / Province - State or province where the address is located.
- Postal - ZIP code for this address.
- Country - Country where the address is located: US for the United States or CA for Canada.
- Label - Custom identifyer for the address (for example: home, mom's apartment)
You may add a new address by clicking +Add Address, and filling in all the fields described above.
Contacts
The customer's contact information will be organized in a table showing the following information:
- Primary - Indicates whether this is the customer's primary contact channel.
- Contact - Mobile phone number, email address or landline.
- Type - Type of contact information: Email, Mobile or Landline.
- Label - Custom identifyer for the address (for example: office phone, personal email)
You may add a new address by clicking +Add Contact, and filling in all the fields described above.
Account Vault
The customer's contact information will be organized in a table showing the following information:
- Primary - Indicates whether this is the customer's primary payment method.
- Account - Network (Visa, Mastercard, AMEX, etc.) and last four digits of a credit or debit card.
- Type - Type of payment method.
- Valid Thru - Card's expiration date.
- Name On Account - Name used in the credit or debit card.
- Billing Address - Address used in the credit or debit card.
- Last Updated - Date stamp of the latest update to the payment method.
You may add a new address by clicking +Add Account, and filling in all the fields described above.
History
This section presents a log of all of a customer's transactions: payments, invoices, recurring plans, orders, and products.
- Payments - View all payment transactions associated with the customer, including how the payment was made and its processing details.
- Reference - Unique identifier assigned to the payment transaction.
- Transaction Type - Type of transaction processed, such as sale, refund, or authorization.
- Tender - Payment method used, such as credit card, ACH, or another payment type.
- Amount - Total amount charged or processed in the transaction.
- Surcharge - Additional fee applied to the transaction, if applicable.
- Status - Current processing status of the payment, such as approved, declined, or pending.
- Authorization Code - Code returned by the payment processor confirming authorization of the transaction.
- Invoice - Associated invoice linked to the payment, if one exists.
- Source - Origin of the transaction, such as the system, terminal, or online checkout.
- Date & Time - Date and time when the payment transaction was processed.
Note:
If you need to process a new payment, you may click +Add Payment on the right to do so (learn more about payments in the Payments portal guide.
- Invoices - View all invoices issued to the customer and their billing status.
- Invoice Number - Unique identifier assigned to the invoice.
- Total - Total amount billed on the invoice.
- Status - Current status of the invoice, such as paid, unpaid, or overdue.
- Invoice Date - Date when the invoice was created.
- Due Date - Date by which the invoice payment is expected.
- Terms - Payment terms associated with the invoice, such as net 30 or due on receipt.
Note:
If you need to create a new invoice, you may click +Add Invoice on the right to do so (learn more about invoicing in the Invoices portal guide.
- Recurring - View recurring billing agreements set up for the customer.
- Contract Number - Unique identifier assigned to the recurring billing contract.
- Frequency - How often the recurring billing occurs, such as weekly or monthly.
- Every - Interval at which the billing repeats within the selected frequency.
- On - Specific day or date when the recurring billing is processed.
- Amount - Amount charged for each recurring billing cycle.
- Status - Current status of the recurring billing agreement, such as active, paused, or cancelled.
- Last Billed Date - Most recent date when the recurring charge was processed.
Note:
If you need to create a new recurring contract, you may click +Add Contract on the right to do so (learn more about recurring contracts in the Recurring portal guide.
- Orders - View all orders created for the customer and their fulfillment and payment status.
- Order Number - Unique identifier assigned to the order.
- Total - Total amount of the order.
- Order Status - Current state of the order in the order management process.
- Payment Status - Indicates whether the order has been paid, partially paid, or remains unpaid.
- Fulfillment Status - Status of order fulfillment, such as unfulfilled, partially fulfilled, or fulfilled.
- Order Date - Date when the order was created.
- Source - Origin of the order, such as online store, manual entry, or another channel.
Note:
If you need to create a new order, you may click +Add Order on the right to do so (learn more about recurring contracts in the Orders portal guide.
- Products - View products associated with the customer and their purchase history.
- Name - Name of the product.
- Collection - Product collection or category to which the item belongs.
- Purchased - Total number of times the product has been purchased by the customer.
- Last Date Purchased - Most recent date when the customer purchased the product.
Note
This space is only dedicated to special notes regarding a customer. You will find the following information about each one:
- Date Created - Date in which the note was created.
- Author - Name of the user that created the note.
- Note - Contents of the note.
You may always add a new one by pressing +Add Note and writing in the desired information.
ePay
This section is only dedicated to the registration information for MX ePay. You will see the following information:
- Is Registered - Indicates whether or not the customer is registered on MX ePay.
- Email - Email address with which the customer was registered on MX ePay.
- Registration Code - Code used for registration onto MX ePay.
If a customer needs to register onto MX ePay, you may send an invite using the Send Invite option on the right to start the process.